
配置说明: 本指南将配置以下协议和加密方式:
- 协议:VLESS
- 传输方式:WebSocket (WS)
- TLS 加密:通过 Nginx 提供 TLS 1.2/1.3 加密(HTTPS)
- 端口:10001(HTTPS 端口,由 Nginx 监听并转发到 Xray)
准备工作
在开始安装之前,请确保您已准备好以下内容:
- VPS 服务器:一台可用的虚拟专用服务器(VPS),建议使用 Linux 系统(如 CentOS、Ubuntu 等)
- 域名:一个已注册的域名,并确保域名已正确解析到您的 VPS 服务器 IP 地址
提示:
- 确保您的 VPS 服务器可以正常访问互联网,并且已配置好基本的系统环境。
- 本文档中使用的示例域名为
example.com(实际配置时请替换为您自己的域名)。
安装 Xray
执行以下命令进行一键安装:
bash -c "$(curl -L https://github.com/XTLS/Xray-install/raw/main/install-release.sh)" @ install
安装成功后会显示如下内容:
[Service]
ExecStart=
ExecStart=/usr/local/bin/xray run -config /usr/local/etc/xray/config.json

installed: /usr/local/bin/xray
installed: /usr/local/share/xray/geoip.dat
installed: /usr/local/share/xray/geosite.dat
installed: /usr/local/etc/xray/config.json
installed: /etc/systemd/system/xray.service
installed: /etc/systemd/system/xray@.service
配置 Xray
打开 Xray 配置文件,配置 Vless 协议
路径: /usr/local/etc/xray/config.json
{
  "log": {
    "access": "/home/v2ray/log/access.log",
    "error": "/home/v2ray/log/error.log",
    "loglevel": "warning"
  },
  "inbounds": [
    {
      "listen": "127.0.0.1",
      "port": 12345, // Xray内部监听端口,可自定义(建议范围:10000-65535)
      "protocol": "vless",
      "settings": {
        "clients": [
          {
            "id": "xxxxxxxx-xxxx-xxxx-xxxx-xxxxxxxxxxxx", // 实际使用时请替换为您的UUID(可通过 uuidgen 命令生成)
            "flow": ""
          }
        ],
        "decryption": "none"
      },
      "streamSettings": {
        "network": "ws",
        "wsSettings": {
          "path": "/download/latest"
        }
      },
      "sniffing": {
        "enabled": false,
        "destOverride": [
          "http",
          "tls"
        ],
        "routeOnly": true
      }
    }
  ],
  "outbounds": [
    {
      "protocol": "freedom",
      "tag": "direct"
    },
    {
      "protocol": "blackhole",
      "tag": "block"
    },
    {
      "protocol": "socks",
      "settings": {
        "servers": [
          {
            "address": "127.0.0.1",
            "port": 40000
          }
        ]
      },
      "tag": "warp"
    },
    {
      "protocol": "freedom",
      "settings": {
        "domainStrategy": "UseIPv6"
      },
      "tag": "ipv6_only"
    }
  ],
  "routing": {
    "domainStrategy": "IPIfNonMatch",
    "rules": [
    {
      "type": "field",
      "domain": [
        "geosite:category-ads-all"
      ],
      "outboundTag": "block"
    },
    {
      "type": "field",
      "protocol": [
        "bittorrent"
      ],
      "outboundTag": "block"
    },
    {
      "type": "field",
      "domain": [
        "geosite:cn"
      ],
      "outboundTag": "direct"
    },
    {
      "type": "field",
      "ip": [
        "geoip:cn",
        "geoip:private"
      ],
      "outboundTag": "direct"
    }
  ]
}
安装 Nginx
1. 执行安装命令
添加 Nginx 官方软件源:
sudo dnf install -y dnf-utils
sudo vim /etc/yum.repos.d/nginx.repo
粘贴内容到 nginx.repo 文件内:
[nginx-stable]
name=nginx stable repo
baseurl=http://nginx.org/packages/centos/$releasever/$basearch/
gpgcheck=1
enabled=1
gpgkey=https://nginx.org/keys/nginx_signing.key
module_hotfixes=true

[nginx-mainline]
name=nginx mainline repo
baseurl=http://nginx.org/packages/mainline/centos/$releasever/$basearch/
gpgcheck=1
enabled=0
gpgkey=https://nginx.org/keys/nginx_signing.key
module_hotfixes=true
2. 开始安装 Nginx
sudo dnf clean all
sudo dnf makecache
sudo dnf install -y nginx
sudo systemctl start nginx
sudo systemctl enable nginx
申请免费的 SSL 证书
1. 注册 ZeroSSL 账号
重要提示: 在申请证书之前,请先访问 https://app.zerossl.com/ 注册一个账号。注册时使用的邮箱地址将用于后续的证书申请命令。
2. 下载 acme.sh
curl https://get.acme.sh | sh
注意: 如果安装失败,请检查是否缺失解压缩类的工具,比如:
main: line 7306: tar: command not found执行命令安装即可:
sudo dnf install tar -y
3. 申请并自动续期 SSL 证书
说明: 将以下命令中的
your-email@example.com替换为您的 ZeroSSL 邮箱,example.com替换为您的域名。
第 1 步:注册 ZeroSSL 账号
/root/.acme.sh/acme.sh --register-account -m your-email@example.com # 请替换为您的ZeroSSL注册邮箱
提示: 此命令只需执行一次。
第 2 步:申请证书(Webroot 模式)
/root/.acme.sh/acme.sh --issue -d example.com --webroot /usr/share/nginx/html # example.com 请替换为您的实际域名
提示: 使用
--webroot模式可与运行中的 Nginx 配合,避免端口冲突。
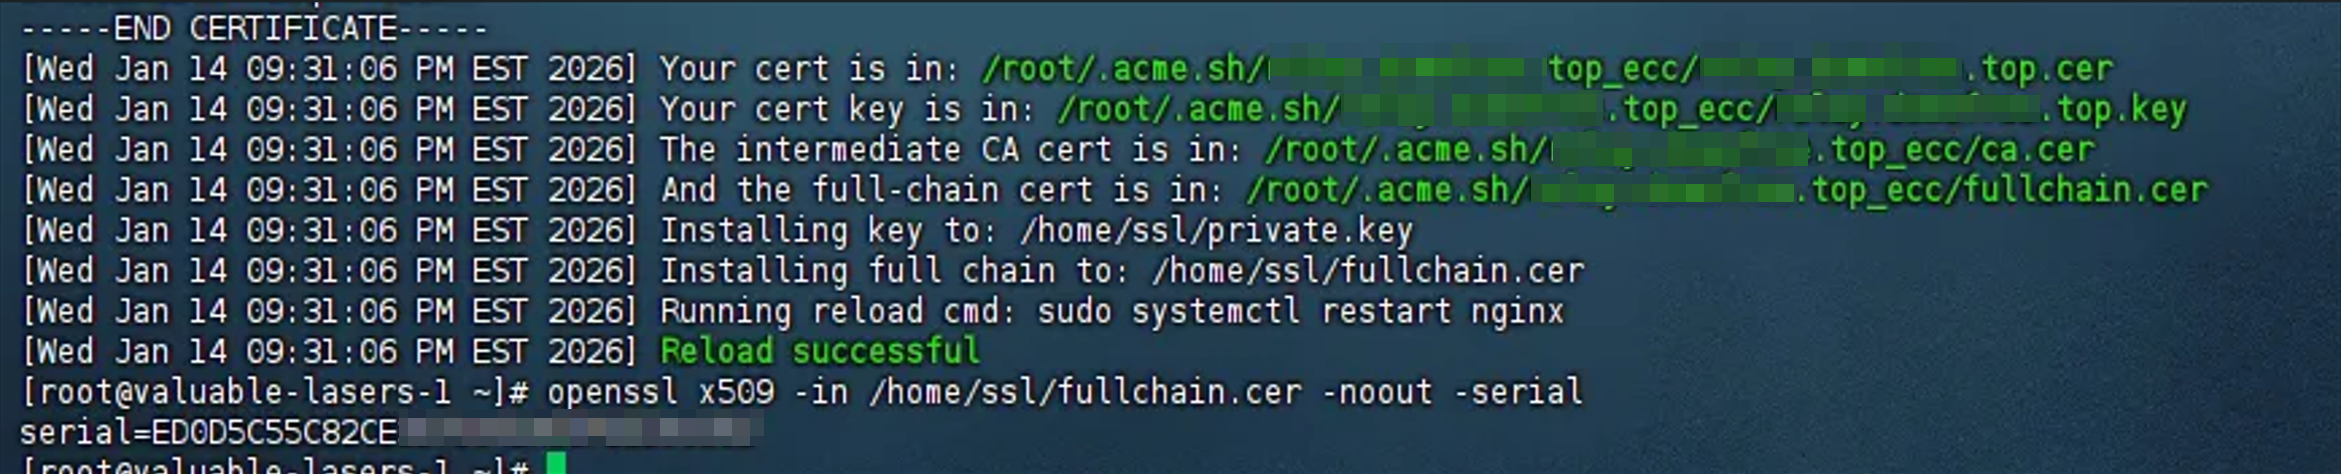
第 3 步:安装证书
# example.com 请替换为您的实际域名
/root/.acme.sh/acme.sh --install-cert -d example.com \
--key-file       /home/ssl/private.key  \
--fullchain-file /home/ssl/fullchain.cer \
--reloadcmd     "sudo systemctl reload nginx"
提示: 证书会自动安装到指定目录,并配置自动续期。
第 4 步:验证自动续期
-
检查定时任务:
sudo crontab -l应能看到包含
/root/.acme.sh/acme.sh --cron的任务。 -
测试续期流程:
/root/.acme.sh/acme.sh --renew -d example.com --force # example.com 请替换为您的实际域名看到
Success提示即表示自动续期配置成功。
Nginx 配置
注意: Nginx 版本需要 1.24.x 以上
1. 创建 Nginx 配置文件
在 /etc/nginx 下新建 xray_nginx.conf 文件并填入下面内容:
# 全局配置
user nginx;
worker_processes auto;
error_log /var/log/nginx/error.log warn;
pid /run/nginx.pid;


# Events 模块
events {
    worker_connections 1024;
}


# 七层代理模块
http {
    # 基础 HTTP 配置
    sendfile on;
    tcp_nopush on;
    tcp_nodelay on;
    keepalive_timeout 65;
    types_hash_max_size 2048;
    include /etc/nginx/mime.types;
    default_type application/octet-stream;

    # 日志配置
    log_format main '$remote_addr - $remote_user [$time_local] "$request" '
                    '$status $body_bytes_sent "$http_referer" '
                    '"$http_user_agent" "$http_x_forwarded_for"';
    access_log /var/log/nginx/access.log main;

    # Server 1: Xray 的 HTTPS 服务 (内部监听)
    server {
        listen 10001 ssl http2; # HTTPS端口,可自定义(建议使用非标准端口)
        server_name example.com; # 请替换为您的实际域名

        # SSL 证书配置
        ssl_certificate /home/ssl/fullchain.cer;
        ssl_certificate_key /home/ssl/private.key;

        # SSL 优化配置
        ssl_protocols TLSv1.2 TLSv1.3;
        ssl_ciphers 'ECDHE-ECDSA-AES128-GCM-SHA256:ECDHE-RSA-AES128-GCM-SHA256:ECDHE-ECDSA-AES256-GCM-SHA384:ECDHE-RSA-AES256-GCM-SHA384:ECDHE-ECDSA-CHACHA20-POLY1305:ECDHE-RSA-CHACHA20-POLY1305:DHE-RSA-AES128-GCM-SHA256:DHE-RSA-AES256-GCM-SHA384';
        ssl_prefer_server_ciphers off;
        ssl_session_cache shared:SSL:10m;

        # Location 1: 代理到 Xray
        location /download/latest { # 路径需与Xray配置中的wsSettings.path保持一致
            proxy_redirect off;
            proxy_pass http://127.0.0.1:12345; # 端口需与Xray配置中的port保持一致
            proxy_http_version 1.1;
            proxy_set_header Upgrade $http_upgrade;
            proxy_set_header Connection "upgrade";
            proxy_set_header Host $host;
            proxy_set_header X-Real-IP $remote_addr;
            proxy_set_header X-Forwarded-For $proxy_add_x_forwarded_for;
        }

        # Location 2: 伪装网站
        location / {
            root /usr/share/nginx/html;
            index index.html index.htm;
        }

        location @return_redirect {
            return 200 $upstream_http_location;
            add_header Content-Type text/plain;
        }
    }

    # Server 2: 默认的 HTTP 服务 (80 端口)
    server {
        listen 80 default_server;
        listen [::]:80 default_server;
        server_name _;
        root /usr/share/nginx/html;
    }
}
2. 修改 Nginx 服务配置
打开 /usr/lib/systemd/system/nginx.service 文件,修改为以下内容:
[Unit]
Description=nginx - high performance web server
Documentation=http://nginx.org/en/docs/
After=network-online.target remote-fs.target nss-lookup.target
Wants=network-online.target

[Service]
Type=forking
PIDFile=/run/nginx.pid
#Environment="conffile=/etc/nginx/nginx.conf"
Environment="conffile=/etc/nginx/xray_nginx.conf"
EnvironmentFile=-/etc/sysconfig/nginx
ExecStart=/usr/sbin/nginx -c ${conffile}
ExecReload=/bin/sh -c "/bin/kill -s HUP $(/bin/cat /run/nginx.pid)"
ExecStop=/bin/sh -c "/bin/kill -s TERM $(/bin/cat /run/nginx.pid)"

[Install]
WantedBy=multi-user.target
3. 重启 Nginx
sudo systemctl reload nginx
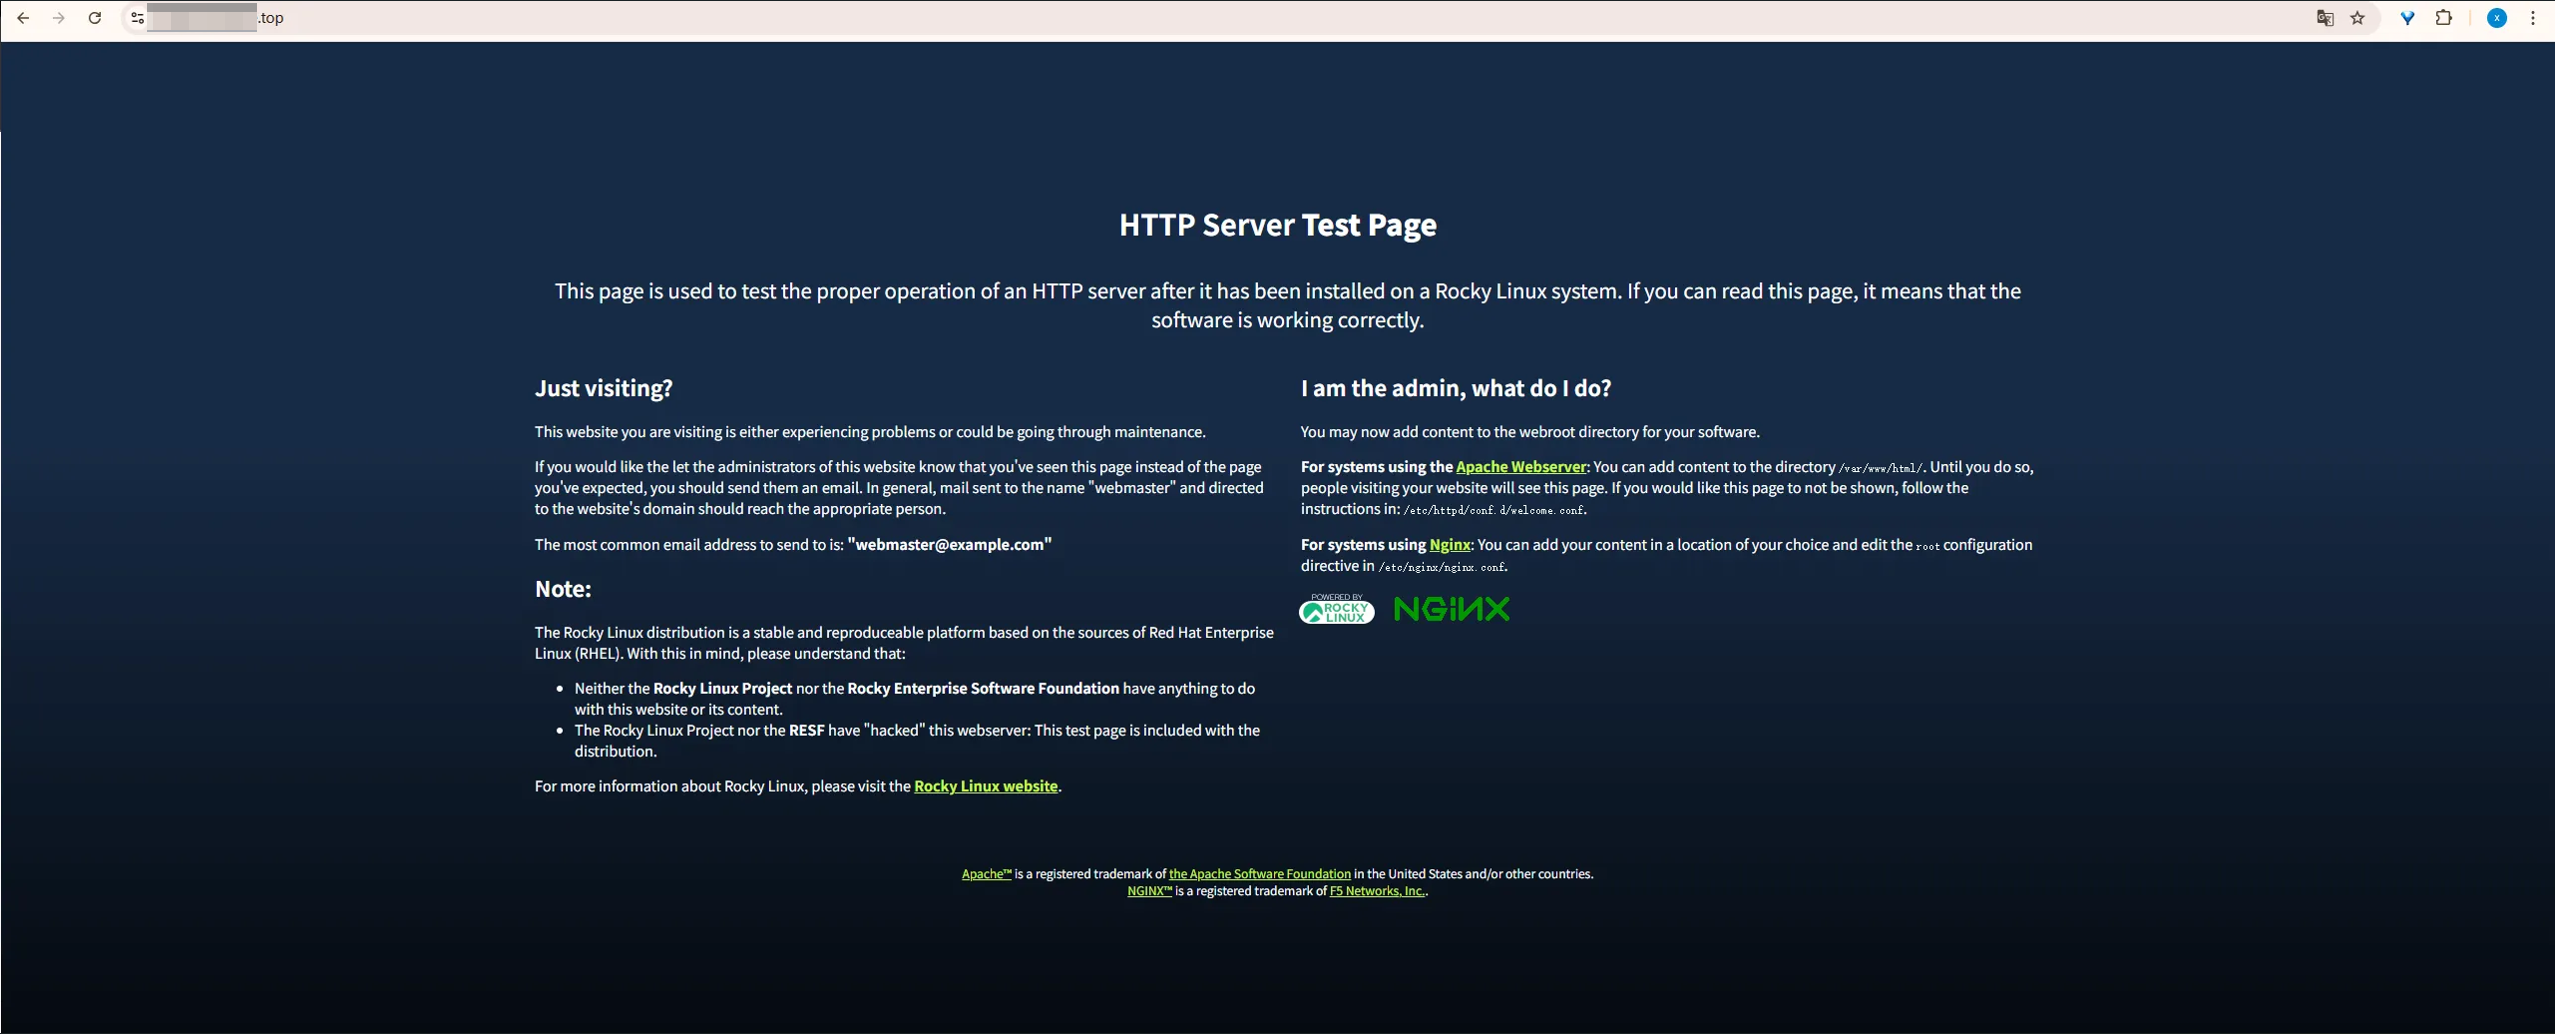
4. 验证配置
访问:https://example.com/
评论